One reason I started this blog was as a repository for contributions to online discussions of technical photography issues that I find myself making over and over again. It will be easier to point to this post the next time someone complains that their software’s panorama function is not doing what they expected when stitching negative scans.
I use a Fuji X-T20 camera to digitize both 35mm negatives and MF negatives. The resolution of the X-T20 is sufficient for both 8×12 35mm prints and 12×12 MF prints, my standard “big” prints. My digitizing setup based on a Leica BEOON copy stand is convenient to use for full frame 35mm negatives. It is much less convenient for full frame 6×6 negatives. And switching between the negative sizes is more time consuming than I like. One solution would be to use the 35mm setup to take several shots of each 6×6 negative and stitch them together with software.
The most common application of image stitching is panoramas. When taking the pictures to be combined into a panorama the camera position is fixed and the camera is pointed a different direction for each shot. In effect, the subject moves relative to the camera. The stitching software takes this into account to stretch and merge the individual shots to create a continuous panoramic image that looks like it was a single shot taken with a very wide angle lens.
Another application of image stitching is to combine partial scans of a negative, print or other flat original that is too large for the scanner. When doing the individual scans to be combined into a larger scan the subject position is fixed and the “camera” position changes. In this application the very last thing we want is any stretching or other distortion of the individual scans. To prevent this, the software has to know that this is not a panorama.
I did not really think all of this through before I tried to stitch together multiple scans of a single MF negative using my favorite photo editing application, Affinity Photo. The composite image had pronounced distortion, i.e., the borders and straight lines in the image were curved. It was pretty obvious what had happened. The software assumed that the individual files were parts of a panorama and deliberately distorted them as if they were. I could find no options in Affinity Photo to address this, and no mention of the issue in the online Affinity Photo tutorials. They may be there, but I couldn’t find them.
Several online sources recommended the application Hugin as a good tool for stitching panoramas. I downloaded a copy and played with it long enough to find that it does treat panoramas and the flat stitched images I was looking for differently. But I also found that it is much more complex in operation than the Affinity Photo stitching function. I hoped I could find something easier to use.
When I ditched all of my subscription Adobe software I saved a copy of Photoshop Elements. Guided by Photoshop Elements HELP I found the following concerning the Photomerge function:
“Select multiple images with overlapping content from the Photo Bin, and then choose Guided room > Photomerge > Photomerge Panorama.”
“In the Photomerge Panorama panel, from the Panorama Settings area, choose the pan motion / layout settings for your images. Click the triangle to see the options available.”
And at the very bottom of the list of options I found the following.
“Reposition – Aligns the layers and matches overlapping content, but does not transform (stretch or skew) any of the source images.”
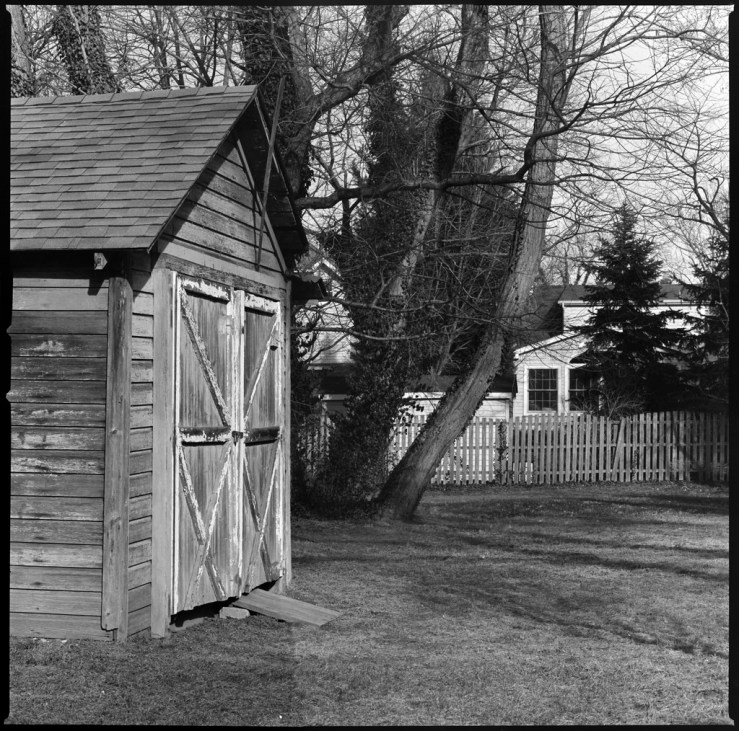
Which sounded like exactly what I was looking for. After less than ten minutes working with Photoshop Elements I was able to produced a composite scan of a Hasselblad negative with absolutely straight edges and straight lines. Of course, all of the standard advice for panoramas, like keeping the exposure the same for all the images and keeping the horizons level still apply. The image above is made up of six partial scans with the BEOON setup. I am very happy with the result.
I don’t know how many MF negatives I will be digitizing in the future, and I don’t know if I will find other stitching software but I know now that I have at least one way to do the job.
(Regular Photoshop has a similar Photomerge function and Lightroom may have it as well. I did not do any panoramas or other stitching when I was using them.)

I’ve been using stitching tools for about a decade now and they’ve become quite good. The one in regular Photoshop regularly blows my mind with what it can pull off. I’ve only ever stitched together panos though.
LikeLike
I’ve taken a few panorama pictures with the iPhone – as close to magic as anything I’ve ever seen a camera do – but I’ve never attempted one with a film camera. I should give it a try.
LikeLike